No matter what the forecast is for the UK as a whole, Wishes in the Rain very rarely becomes Wishes in the Snow, even if it's snowing in the hills nearby. However, I have crochet, and crochet snowflakes are not as cold! They're also perfect to decorate your Christmas tree or to give away to friends. I first crocheted snowflakes to put in Christmas cards a couple of years ago, and very soon I found myself making up patterns for them. I love looking at thread snowflakes but I wanted things that would be quick to make, so if I had a few minutes here or there I could get one finished, so these patterns are simple, easy to make, and written with dk, worsted and aran weight yarn in mind.
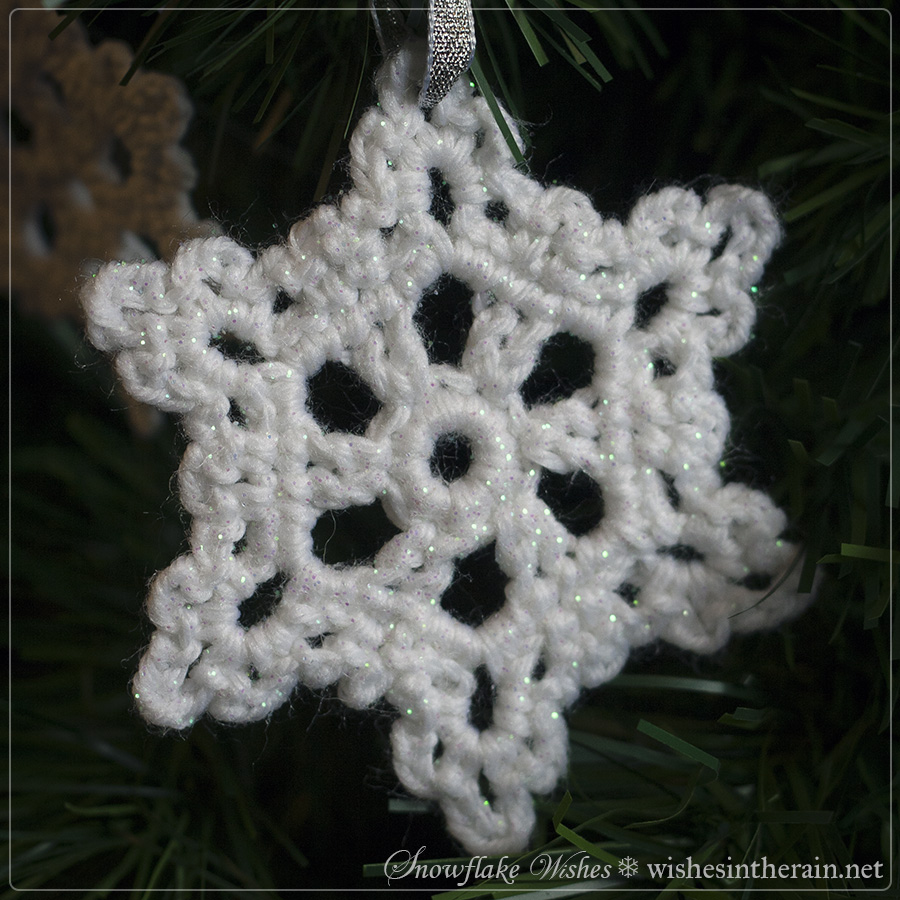
You can make them with a wide range of hooks and yarn combinations. The snowflakes pictured above are dk with a 2.75mm (C) hook on the left and is about 9cm (3.5in) from point to point, and worsted with a 3.5mm (E) hook on the right, about 11cm (4.5in) from point to point.
Any type of yarn will work for snowflakes; personally I like yarns that come with some sparkle for example Sirdar Snuggly Pearls. Depending on your yarn and hook size combination you may need to block the snowflakes. I always block them, even if they do come out flat, with a mixture of water and PVA glue to stiffen them, and to add glitter.
Pattern
You will need:
- Small amount of white yarn in any weight you like (I used worsted and dk)
- Crochet hook, from 2.5mm to 3.5mm (E) or 4mm (G) depending on the yarn you use and how tightly you want to crochet
- Optional thread or ribbon to hang them to a tree - if you don't want to use thread you can make large loop in the snowflake, see below
- needle for weaving in ends
- optional materials for blocking: water, PVA glue and glitter, or spray starch
Stitches used:
US: ch, sl st, sc, dc. Optional,
chainless starting dc.
UK: ch, sl st, dc, tr. Optional, chainless starting treble (see link above for explanation in US terms).
US Instructions:
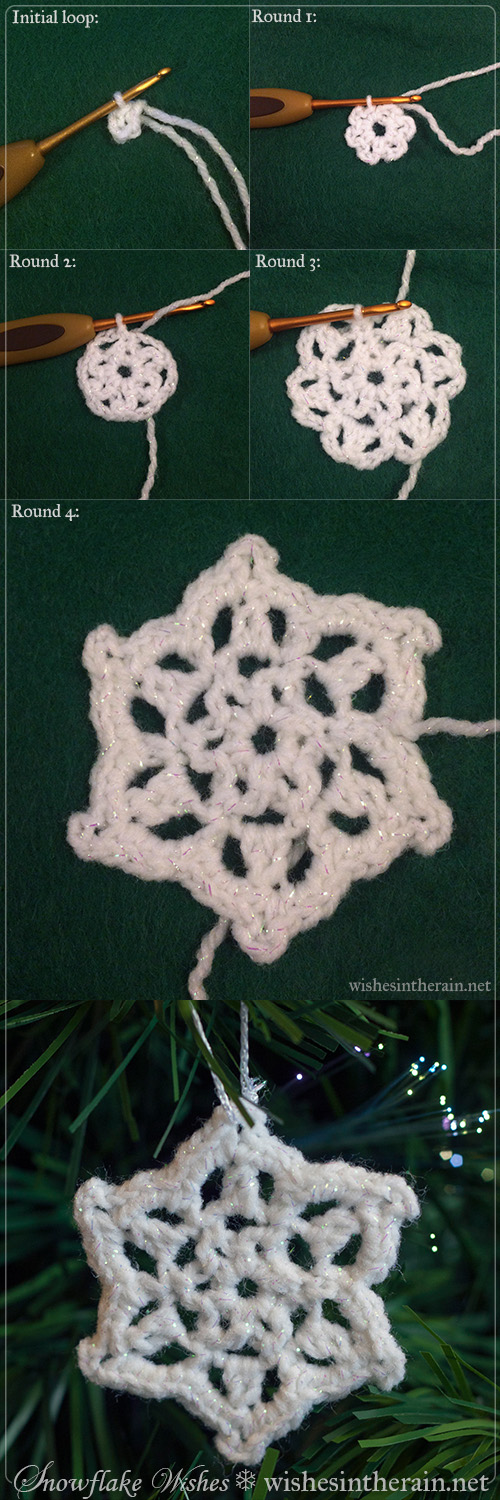
Ch5, join with sl st to form loop
Round 1: ch3 (or make chainless starting dc), dc 11 times into loop, sl st into 3rd ch of ch3/starting dc to join.
Round 2: ch5, sc in next st, ch3, *sc into next st, ch5, sc in next st, ch3* five times, sl st into first st to join.
Round 3: sl st into first ch5 loop, ch3 (or make chainless starting dc), dc4, ch3, skip ch3 loop, *dc5 in next loop, ch3, skip ch3 loop,* 5 times, sl st into 3rd ch of ch3/starting dc to join.
Round 4: Ch1, (sc, ch3, sc,) in next st, (sc, ch5, sc,) in next st, (sc, ch3, sc,) in next st, sc, ch3, *sc in next st (skip ch3 from prev round), (sc, ch3, sc) in next st, (sc, ch5, sc) in next st, (sc, ch3, sc) in next st, sc, ch3,* five times, join with sl st to ch1 at start of round. Bind off, weave in ends.
UK Instructions:
Ch5, join with sl st to form loop
Round 1: ch3 (or make chainless starting tr), tr 11 times into loop, sl st into 3rd ch of ch3/starting tr to join.
Round 2: ch5, dc in next st, ch3, *dc into next st, ch5, dc in next st, ch3* five times, sl st into first st to join.
Round 3: sl st into first ch5 loop, ch3 (or make chainless starting tr), tr4, ch3, skip ch3 loop, *tr5 in next loop, ch3, skip ch3 loop,* 5 times, sl st into 3rd ch of ch3/starting tr to join.
Round 4: Ch1, (dc, ch3, dc,) in next st, (dc, ch5, dc,) in next st, (dc, ch3, dc,) in next st, dc, ch3, *dc in next st (skip ch3 from prev round), (dc, ch3, dc) in next st, (dc, ch5, dc) in next st, (dc, ch3, dc) in next st, dc, ch3,* five times, join with sl st to ch1 at start of round. Bind off, weave in ends.
Here are some photos of what your snowflake should look like after each round. For this one I've used Caron Simply Soft yarn and a 3.5mm hook.
US/UK: Round 4 alternative (for self-loop snowflake): Replace one ch5 with ch20 or ch25 to make a large loop. Make rest of round as normal.
Blocking
Blocking with PVA and glitter is messy but to my mind, worth it. Here's a picture of the steps I go through, followed by an explanation. Of course, you can leave your snowflakes unblocked or block them with spray starch instead.
1. I make sure I've sewn in all the ends etc before blocking snowflakes, and sort out ones that are self-looping to one side so I don't accidentally get the loops glue-y. I also prepare my workspace with some cling film so as not to glue glitter to surfaces in my living room, and I put cling film over a tray to hold the snowflakes while they dry. It may also be wise to have some kitchen roll to hand to mop up any spills.
2. I use Mod Podge but you can use any PVA glue. The glitter I have was sold as flower glitter in Hobbycraft a few years ago. I like it because the flakes are a little larger than most glitters. I think this technique works much better with iridescent glitter than metallic glitter, because when it's not catching the light metallic glitter looks like little black spots on the snowflakes, but iridescent glitter is harder to see.
3. I use those plastic boxes you get takeaway food in to mix my glue and water, but you can use anything you don't mind cleaning that is big enough to fit your largest snowflake in comfortably. I can't give exact amounts of how much glue and water to use, but it's around 50-50.
4: With glitter, more is more. I start off with a generous amount but keep finding myself adding more.
5. Mix the glue and water well. The resulting liquid will be very runny, not unlike cream.
6. Dunk a snowflake in the mix, and squish it with a spoon to make sure the mix soaks through.
7. Squeeze out the excess mix. I do this in my hands and don't wear gloves, so this is the messy part for me. Be aggressive - you don't want any bubbles of mixture forming in the holes in the snowflake.
8. Pull the snowflake back into shape, and lay out on the cling film to dry. You could pin it out if like and have a surface that you don't mind getting a bit gluey- maybe old foam?
I got about 14 snowflakes of different sizes done in that one box of mix pictured above. If you're running low, add a bit more water, glue, and glitter. Leave for at least a couple of days and then carefully peel the snowflakes off the cling film. Most of them don't stick but the occasional one may.
If you have made self-loop snowflakes, follow the same procedure but make sure not to get the loop wet or it will harden and be more difficult to use. For these, it's better to squeeze them flat in a folded piece of kitchen roll before reshaping and putting out to dry.
I used silver ribbon, and crochet thread to make loops to hang the snowflakes. The brands I used were Anchor Artiste Metallic thread in silver and Twilleys of Stamford Goldfingering in white. Where the holes in the snowflakes were smaller I used a needle to get the thread through. Burlap/hessian string might look nice, or twine. I have tried silver elastic but found it wasn't cost effective when purchased by the metre from the local haberdashery.
Enjoy your snowflakes, and look out for more patterns coming soon ♥