Monday, 21 July 2014

What I Made: kawaii octopus


multi-coloured crochet octopus amigurumi
octopus!
Be honest: don't you think this little guy is super cute? I decided to look for some easy Amigurumi patterns the other day, because I thought it would be fun to make some toys, and I found this on ravelry. The pattern is Kawaii Octopus Amigurumi. I used some Red Heart Super Saver yarn my husband picked up in America last time he had a conference there, and a 4.5mm hook, although the pattern now suggests 3.75mm. I really struggle to find things to do with variegated yarn like this so I was very happy with how he turned out.


octopus amigurumi at church
octopus met his new owner at church

Making the legs were a bit tricky but the photos in the pattern are really helpful. Overall, though, I was really pleased by how quick it was to make. So easy in fact that I made another - this is rare for me because normally I'm all about the new shiny!

mini crochet octopus amigurumi
little octopus
The second one I made was much smaller - I made him with a 2.5mm hook and DMC Natura Cotton which is 4 ply weight, and my new 3mm safety eyes that my friend UnicornReality kindly sent me. Then I saw the Baby Kawaii Octopus pattern.
two tiny crochet ocotopus amigurumis with coin
little octopus and tiny baby octopus, with 10p for reference
The baby one is so tiny! I should probably have embroidered the eyes but I'm happy with him. I really liked both of these patterns, and I can definitely see myself making them again in the future.

Should I make one too? Yes, especially if you need to make a last minute gift for a young child, but bear in mind, safety eyes are probably not safe for children under 3 unless you know they will be closely supervised when playing with the toy.

Sunday, 20 July 2014

What I Made: epoxy sticker pendants


three epoxy sticker pendants

I love making jewellery, and a while ago I experimented with making pendants with epoxy stickers and pendant trays from www.jasminestudiocrafts.com. I bought them because I thought it would be fun to make jewellery with my art in it, but these are just practice attempts, the outer two with cardstock, and the inner one with thin cotton fabric from a dress I made for my niece.

The card was too thick and textured, really, to work well with the stickers, and it was really really difficult to cut in curves! But they're pretty as long as you don't study too too closely.

I was really pleased with the way the middle one turned out - I didn't know what to expect with gluing the fabric because I'd never used Mod Podge with fabric before, but it worked really well!

Later, I thought it would be really nice to try this with children, particularly the children at my church Holy Innocents Fallowfield, as a chance for them to make a few Christmas presents. I got some dark coloured card, some metallic gel pens, and some Christmas wrapping paper. I also got some little boxes to put them in for gifts. Here are some not particularly good pictures of the results:

a christmas tree pendant in a box

a pendant with a geometric pattern in a box
The girls had a lot of fun, and I think they were pleased with the results too. They made two or three each in the space of about half an hour. The older girls (I'm not sure of their exact ages but they're all in primary school) were able to do the whole thing by themselves, and I helped the slightly younger ones out by cutting the card to size for the pendants after they'd stuck the stickers on.

Should I make some too? Yes. It can be a bit of a gateway drug craft into more elaborate experiments with glass domes and resin, though, so be warned! Particularly try this if you make art and would like another idea for how to use it, or if you have children you need to entertain for an hour or so.

What I Made: Autumn Flowers Shawl

shawl draped over the back of a chair


I made this a couple of years ago, when I bought some cream fingering weight yarn and some beautiful Debbie Bliss Party Angel in brown with gold flecks, and I spent quite some time deciding what to do with them. I found the Creeping Daisy Shawl pattern on Ravelry, and was struck immediately by how lovely it looked.

I started off in cream but pretty quickly decided that the fingering weight yarn was too light, even though that's what others had used to make the shawl, so I dragged my husband to the yarn store again and got some green Wendy merino DK.

The first part of the shawl was deceptively easy, and while it took me a couple of evenings to complete, I'm sure if I'd concentrated I could have done it quicker. I then blocked that part because the edges were curling over.

closeup photo of crocheted flowers
flowers detail

The flowers were more difficult, however. I think this was partly because it used a stitch I wasn't used to, but also because the  Party Angel yarn is hard to work with- it's really hard to unravel mistakes and, in the colour I used, even see the stitches. I did them over two evenings and most of the weekend. They were extremely pretty when done though.

closeup of crochet edging
edging detail
The love/Solomon knot edge looked as though it was going to be really quick and easy, and was reasonably fast until my inner perfectionist collided with the puff stitches. I had to do the first few over and over again until I got the right number of loops to make the puffs look puffy. I got much faster as I went a long. The daisy chain that weaves through it was easy and fast, and I decided to mix it up a bit with different sizes of flowers.

This is a lovely shawl, and I've continued to wear it on and off for a couple of years now. I've had a lot of compliments on it! I'd like to make another at some point, though possibly using an easier to handle yarn for the flowers. It took a little longer than I thought it would, but by comparison to the other patterns I've tried it's pretty fast.

Should I make one too?  Yes, especially if you want to give someone a unique and eye-catching gift, something a little different from the average handmade shawl.

Wednesday, 7 May 2014

It's ok to look down

mobile phone
such mobile. very phone.
 I've been seeing the Look Up video by Gary Turk doing the rounds on Facebook recently, and to be honest, it annoys me. Other than the fact that I find its attempts to tug on the heartstrings to be depressingly transparent, here's why.

When I was a child, I was often lonely. I had no siblings, I had good friends but they didn't live close to me. I couldn't just go into the park and play with them. If I went into the park I went alone. School holidays were lonely for me too. But I know that if I'd had the internet then, I wouldn't have felt quite so alone. I sometimes feel now that I'm not worth anyone's time; text messages and Facebook mean that I can say things and share things without being held back by that feeling- I feel as though I'm giving other people the choice whether to spend time and interact with me and I'm honoured if they do but I'm not pressuring them.

I have genuine, loving relationships with people on the other side of the world and I truly believe that technology can help us start to think of everyone as people, not just the handful we interact with on a daily basis in the 'real' world. I've seen lots of people find love and lasting relationships by means of websites and technology.

I do think it's sad when you're in a social setting everyone is glued to their screens, and I think we should be conscious of when it's happening and unplug and put things away. And I know that people can use the internet for terrible things, like picking on and bullying the vulnerable. But there was no mythical time when everyone was connected in the real world. Loneliness wasn't caused by smartphones.

When I spent weeks sitting in my living room after surgery because I had to have my leg immobile, my online friends were my only friends most days. They were there for me in a way that real life friends often couldn't be because they had their lives to lead and I couldn't physically go and join them in that.

So by all means, go out, talk to people. Enjoy the moment and don't be obsessed with recording it for likes. Take advantage of the good parts of technology, try to resist the bad parts, and don't feel guilty for not unplugging or self righteous because you do. Look up every once in a while but don't let your head get lost in the clouds.

Thursday, 6 June 2013

Free Pattern: Lacy Coasters

two crochet lacy coasters

At the beginning of this week I moved offices. Where I was before there wasn't really any scope for expressing myself because it was in a more public area, and there was lots of work stuff around that didn't really fit with my style.

lacy coaster beneath a mug
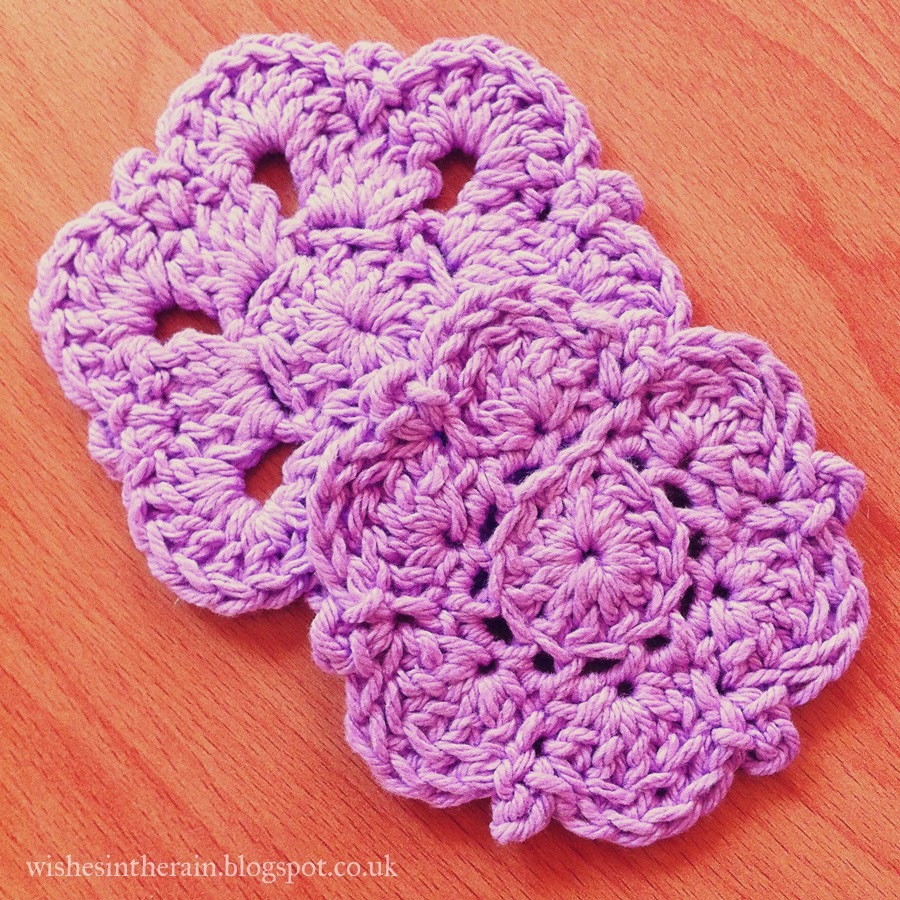
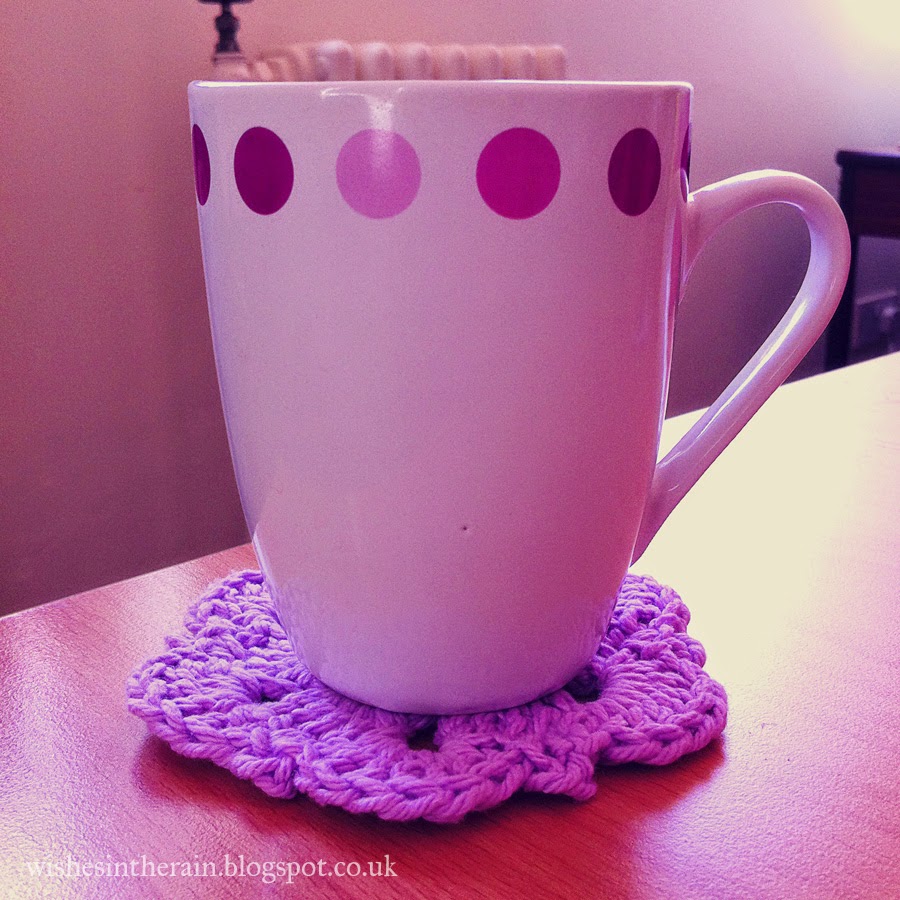
However, my new office was almost literally a blank canvas. It is very bright, very magnolia, but very plain, with no decoration in at all. I wanted to start by cheering up my desk, so I thought it would be nice to make some coasters, and to express my current obsession with picots and shell stitches. I didn't want to take too much time though, so these are lacy without being full on, lightweight yarn lacy.

lacy mat beneath a clock
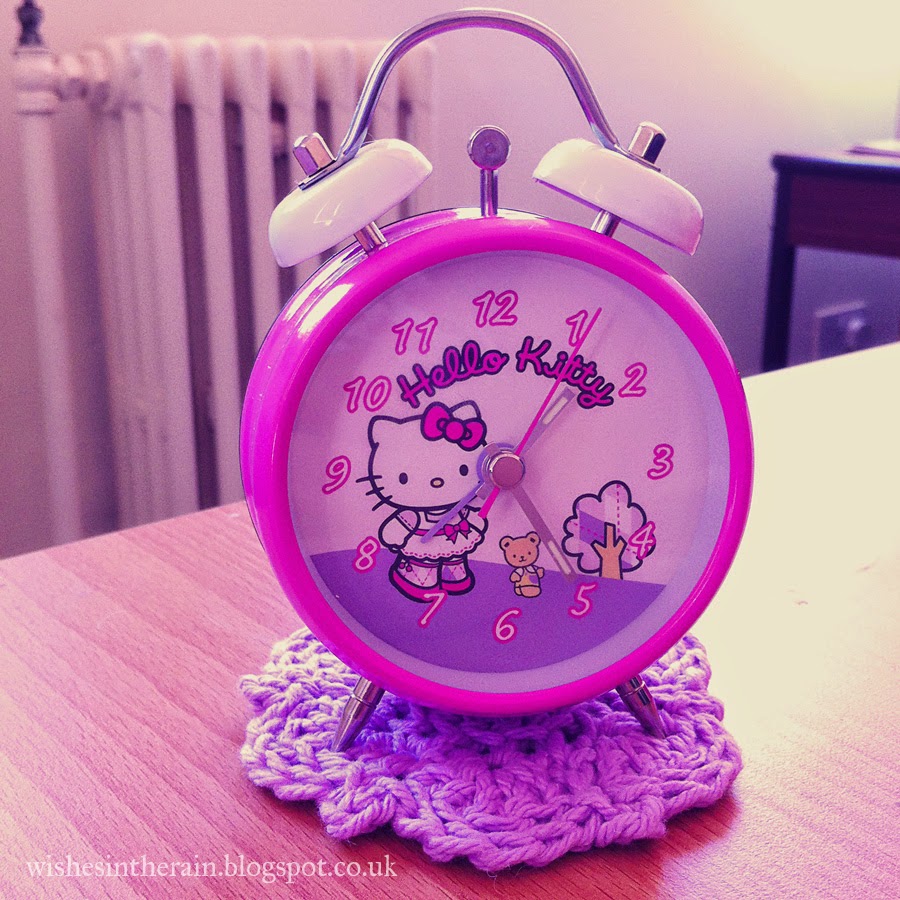
I also picked up this really cute hello kitty clock, so I thought it would be nice to make a smaller coaster to put that on, too.

Patterns
These coasters should be pretty easy to make. The smaller one requires you to crochet in back loops. If you're not familiar with doing that, here is a good tutorial.
I blocked these to make them lay completely flat by laying them face down on an ironing board, placing a tea towel over them, spraying the tea towel with water and ironing them briefly through the damp tea towel.

You will need:
  • A small amount of worsted weight yarn (I used Lily Sugar'n cream, and used less than half a ball for the three coasters)
  • A 5mm hook (US size H)
Pattern is in US terms throughout.

large lacy coaster

Large Coaster
This coaster measures about 11cm across with the yarn/hook combination above.

Round 1: Make a magic ring, chain 2 (counts as first dc), 11dc in the ring. Pull tight & sl st into top of chains to join the circle.
Round 2: *Ch 2, skip a dc and sl st into the next dc* repeat from * 6 times. (Six ch 2 loops made)
Round 3: Sl st into first ch2 loop, ch 3, (counts as a dc) dc 4 into the loop. *ch2, 5dc in next loop* repeat from * 5 times, ch 2, sl st into top of ch 3.
Round 4: sl st in top of next 2 dcs, *ch 3, sl st in same dc, dc 7 times into next ch2 space, skip 2 dcs, sl st into next dc* repeat from * 6 times. Fasten off and weave in ends.


small lacy coaster

Small Coaster
This coaster measures about 9cm across with the yarn/hook combination above.

Round 1: Make a magic ring, chain 2 (counts as first dc), 11dc in the ring. Pull tight & sl st into top of chains to join the circle.
Round 2: 2sc in back loop in each dc around. sl st into first sc. (24 sc).
Round 3: *Skip 1 sc, 5 dc in next sc, skip one sc, sl st in next sc* repeat from * 6 times
Round 4: *ch3, sl st in same stitch, sc in back loops of next 5 dcs, sl st into next st* repeat from * 6 times. Fasten off and weave in ends.

Enjoy your new little coasters! ♥

Wednesday, 24 April 2013

Lemon Mint Mini Cupcakes

mini cupcaked iced with lemon decorations
I love baking, especially cakes, and I'm always eager to try new things and new flavours. I was hosting my flute group last week, and, armed with a new mini cupcake tin, I thought it would be nice to have a spring like flavour for our refreshments. So I went with lemon mint.

Naturally the first thing I did was google for ideas. I really liked the idea of infusing butter with mint flavour I saw on Stephen Andrew Jones' lemon mint cupcake recipe. I wanted to use ingredients I had in the house, though, so I decided to modify my current favourite basic cupcake recipe. I added a ton of different flavourings because I wanted the taste to be stronger as I sampled the batter. I'm very lazy and now I have a stand mixer I don't bother folding flour for small cakes, I just try not to mix the flour for long.

Ingredients (makes 12 cupcakes/36 mini cupcakes)
  • 50g butter
  • 100g margarine
  • a few fresh mint leaves
  • 150g sugar
  • 3 eggs
  • 150g self-raising flour, sifted
  • 1/2 tablespoon lemon juice
  • 1/2 tablespoon strong spearmint tea (Optional. I used 2 spoons of spearmint to about 100ml of boiling water. You could use peppermint tea or extra drops of peppermint extract.)
  • 1/2 tablespoon lemon curd
  • a few drops peppermint extract
  • a few drops orange flower water
  • 1/2 teaspoon of vanilla essence (Optional. I have to put vanilla in all the things. Even if only a tiny bit. Don't judge me.)
Method

Preheat the oven to 175-180deg C, depending on your oven.

In a bowl, chop up the butter and the mint leaves, and put the bowl in a saucepan 1/3 full of water over a medium heat to melt it. Allow to sit for a few minutes (up to 15 - I did less as I was in a hurry) and take off the heat. Strain out the mint leaves and leave to cool (I hurried it up in the fridge).

Cream the butter and sugar in a stand mixer if you have one. Add each egg with a spoonful of flour to prevent curdling. After the third egg add the lemon juice, tea, lemon curd, peppermint extract, orange flower water and vanilla.

Turn the mixer down to low and add the flour. Mix until combined.

Spoon the mixture into cupcake or mini cupcake cases, and bake for 15-20 minutes until golden. Remove from oven and cool on a wire rack.

Icing
I made standard buttercream (150g butter, 300g icing, 2 tablespoons milk) but used single cream instead of milk and added equal amounts of lemon juice and spearmint tea (1/2 tablespoon of each) and equal amounts peppermint extract and orange flower water (a few drops each).

Everyone loved them - my flute group, my church group and some work colleagues. The flavour was strong enough to be distinguishable in the cake instead of coming just from the icing. A recipe I hope to make again.

Thursday, 7 March 2013

Projects and ideas

I feel like I have a lot of projects on the go at the moment. I probably always do. Right now...

folded baby blanket tied with a ribbon

...I just finished a Baby Blanket.  The pattern is Classic Baby Blanket. I didn't follow the pattern exactly because I used dk weight yarn where it called for aran, and therefore a smaller hook, though perhaps not small enough. My blanket didn't wind up being all that ribbed, but it is pretty and very very soft after I washed and sort of blocked it. If you're interested in the yarn I used etc, you can check it out on my Ravelry Project Page.

sunshine flower coasters

I am making Flower Coasters for Mothering Sunday, which is this Sunday in the UK. I am going to put the pattern on this blog when I'm finished, if you want to make some too. I don't think I'll get it done in time for Mother's day over here, but it should be done for Mother's day in the US at least!

work in progress crochet blanket
Instagram photo of the Owl Blanket I am making for my niece. She is two and she loves owls. It's so colourful! I need to get it done in the next week. There are so many ends to weave in D:

I keep eyeing up a recipe for Strawberry Milk Cake. I recently got some bright food colours (of which more in another post) and the idea of making a bright pink cake appeals. Rather too much. I rarely make big cakes - I normally go for cupcakes. So I might make this for my birthday next week, although I don't think I'll have anyone but my husband to eat it with on the day... I'll have to see.