I don't know why, but I can't wear normal gloves. I was able to wear mittens as a small child, but anything around the ends of my fingers make my hands feel itchy. I love wrist warmers/fingerless gloves/fingerless mitts a lot. I think the only thing I don't love about them is that they have so many different names! ;)
Every year since I've been able to crochet I've made myself a new pair. Normally I lose my wrist warmers during the summer (I think somewhere there must be a stash of them in my house that I can't find). Although this year was an exception, and I do still have my wrist warmers from last year, I wanted some new ones anyway. A girl can never have too many accessories, right?
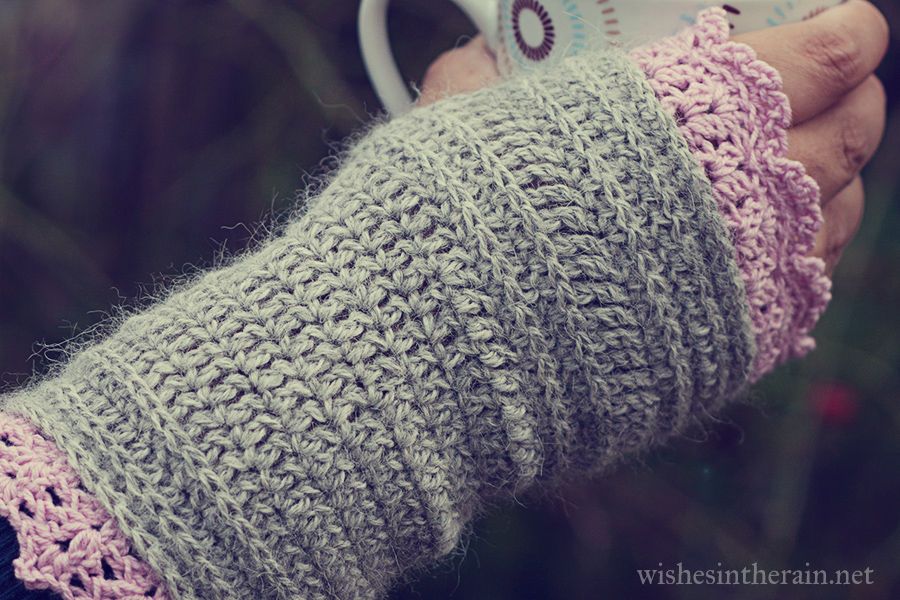
Recently, I have become interested in 3rd loop hdc stitches. I love how they add a little bit of dimensional texture to a flat piece of crochet, and how they're like knitting, but not quite the same. I also felt that I need some pink, and some lace... and A Kingdom Far, Far Away was born. I made these for me, to be the perfect shape and length, but you can make them for you too with just a bit of work. There are some more advanced stitches here, for example the third loop hdc, foundation hdc, and chainless starting dc, but don't be put off - they're easy to learn, I'm linking tutorials, and some, like the chainless starting dc, can change a lot of your projects for the better (seriously it is that good of a stitch). You will have to work out the number of stitches for the size you want, but I've tried to make it as straightforward as possible. I have only made these once so apologies in advance for any errors!

Pattern
Notes:
My gauge was 42hdc = 8in/20cm. My wrist warmers/fingerless gloves were 9in (23cm) long - around 7in (18cm) for the main section and 1in (2.5cm) each for the top and bottom borders. Don't worry if you can't make gauge, just make the size that fits you. I have only worked out the number of stitches for a large size. However, you can make a smaller/different size if you're not afraid of a little arithmetic.
Calculating increases: Divide number of sts on previous round by 3, subtract 1 for the number of stitches between each increase
Calculating decreases: Divide number of sts on previous round by 3, subtract 2 for the number of stitches between each decrease
All increases and decreases (apart from increase in round 18 if you don't have a multiple of 6 sts) are optional - if you're making these for yourself, do what fits you best. Also feel free to add or subtract rounds between Round 5 and Round 11 to get the length you would like.
The left and right wrist wamers (right and left if you're left handed) are slightly different. Follow the right/left guidelines depending on which one you're making.
You will need:
- Yarn A: around 137yards/125m Sport weight with a 3.75 mm (F) hook (could try dk with a 4mm (G) hook). I used Adriafil Sierra Andina in grey
- Yarn B: around 44yards/40m 4ply with 3mm hook. I used Rowan Wool Cotton 4ply in pink.
- Needle to sew in ends
Stitches used (In US terms throughout): sc, hdc, dc, trc, foundation hdc (fhdc), 3rd loop hdc, chainless starting dc, dc mini cluster (see below), picot (see below).
dc mini cluster: yarn over, pull up loop, yarn over, pull through 2 loops, yarn over, pull up loop (4 loops on hook), yarn over, pull through 2 loops, yarn over, pull through 3 loops.
picot: ch3, sl st into first ch.
Main section:
With Yarn A and 3.75mm (F) hook:
Foundation: 42 (or a multiple of 3 that fits around your arm) fhdc, join with a sl st to make a circle (make sure it doesn't twist).
Round 1: ch1, hdc in first hdc and in each st across. Join with sl st to first hdc. (42)
Round 2: ch1, hdc in 3rd loop of each hdc on previous round. Join with a sl st to first hdc. (42)
Round 3: ch1, normal hdc in each st around. Join with a sl st to first hdc. (42)
Round 4: ch2, (does not count as st on this or any other row) dc in 3rd loop of each hdc around. Join with sl st to first dc. (42)
Round 5: ch2, dc in each st around, join (42)
Round 6: (decrease) ch2, *dec over 1st 2 sts, dc in next 12 sts* three times (39)
Round 7: ch2. dc in each st around, join. (39)
Round 8: (decrease) ch2, *dec over 1st 2 sts, dc in next 11 sts* three times, join (36)
Rounds 9, 10: ch2, dc in each st around, join. (36)
Round 11: (increase) ch2, *2dcs into first st, dc in next 11 sts* three times, join (39)
Round 12: ch1, hdc in each st around. (39)
Round 13: (increase), ch1, working in 3rd loops, *2hdc into first st, hdc in next 12 sts* three times, join (42)
Round 14: ch1, normal hdc in each st around, join (42)
Round 15 Right: ch3, trc in first 33 sts, ch 8, tc in last st, join into first tc (42) (leave 8 sts unworked for thumbhole. If you want a smaller thumbhole, reduce the number of chs and the number of unworked sts.)
Round 15 Left: ch3, trc, ch 8, tc in remaining sts, join to first tc (42) (leave 8 sts unworked for thumbhole)
Round 16: ch1, hdc in each st around (work into bumps of chains for neat finish) (42)
Round 17: ch1, hdc in 3rd loop of each hdc on previous round. Join with a sl st to first hdc. (42)
Round 18: ch1, normal hdc in each st around. Join with a sl st to first hdc. (42) If this row is not a multiple of six, increase by three.
Round 19: ch1, hdc in 3rd loop of each hdc on previous round. Join with a sl st to first hdc. (42)
Round 20: ch1, sc in each st around. Join, bind off & weave in ends.
Thumbhole:
With Yarn A and 3.75mm (F) hook:
Left: join in bottom right corner of thumbhole (near seam). Work 8sc across bottom, 3 sc along trc, 8 sc across top in ch sts, 3 sc along trc, join with sl st into first sc. Bind off & weave in ends.
Right: join in top left corner of thumbhole (near seam). Work 8sc across top in ch sts, 3 sc along trc, 8 sc along bottom, 3 sc along trc, join with sl st into first sc. Bind off & weave in ends.

Top Border:
With Yarn B:
With 3.75mm hook, join Yarn B with a sl st into 3rd loop of hdc from round 19. Sl st in each 3rd loop around (42 sl sts). The photo below illustrates where to join your yarn: (please note I'm left handed so this may look a bit backwards to you!)
 |
| click for larger version |
Round 1: Chainless starting dc, ch1, dc in same st, skip 2 sl sts, *(dc, ch1 dc) in same sl st, skip 2 sl sts* 13 times, join with sl st to starting dc.
Round 2: sl st into ch space, ch2, dc (counts as first dc mini cluster), ch1, dc mini cluster, *(dc mini cluster, ch1, dc mini cluster) in next ch space* 13 times, join with sl st into top of first dc.
Round 3: sl st into ch1 space, 5 dcs into next ch1 space, *sl st into next ch1 space, 5 dc into next ch1 space* 6 times, join with sl st into first sl st
Round 4: in back loops, sc in first dc, (ch3, sc,) 4 times, skip sl st, *sc, (ch3, sc) 4 times, skip sl st* six times, join to first sc, bind off and weave in ends.

Bottom Border
With Yarn B:
With 3.75mm hook, With seam facing you, sl st in 3rd hdc loop of foundation hdc in each st around (42 sl sts)
 |
| click for larger version |
With 3mm hook:
Round 1: Chainless starting dc, 3dc into same sl st, skip 2 sts, *4dc into sl st, skip 2 sts* 13 more times, join with sl st into starting dc
Round 2: sl st into second dc, sl st into space between 2nd and 3rd dcs. Chainless starting dc, 3dc into same space, *4dc into next gap between 2nd and 3rd dcs* 13 times, join
Round 3: sl st into second dc, s sl into space between 2nd and 3rd dcs. Ch 1, *(2hdcs, picot, 2hdcs) into space between 2nd and 3rd dcs* 14 times, join, bind off, weave in ends.
Finishing
I didn't block my wrist warmers and don't think they need it. I think I would only block a pair if the yarn turned out scratchy when crocheted up. Enjoy your new creation! ♥
These are so pretty. I love the detailed edging and the gray and pink are lovely together!! Thank you so much for the pattern!
ReplyDeleteI would love a video tutorial on how to make these
ReplyDelete